리덕스 첫 기초 포스팅에서는 개념을 파악하기 위해 모든 기능을 하나의 소스 코드에 넣었습니다. 즉 액션 정의, 리듀서 설정, 스토어 생성 등의 코드가 모두 한 곳에 있었습니다. 또한 하나의 리듀서를 사용하여 스토어 저장소도 나눠져 있지 않았습니다.
그래서 이번에는 코드를 분리하고 복수의 리듀서를 사용해 보겠습니다. 시간을 절약하기 위해 지난 시간에 했던 카운드 업 로직에 로그인 정보를 저장하는 정도의 기능을 추가하겠습니다. 아래 링크를 참고하세요~!
[Web프론트엔드/리액트] - [React] 리덕스(redux) 기능으로 데이터 관리하기 ① 기초
먼저 액션을 분리해보겠습니다. src/components 폴더 안에 actions 폴더를 만들고 이하 두 개의 소스를 추가합니다.
// ..\test_project\src\components\actions\countActions.js

// 액션 타입 정의
export const SET_COUNT = 'countReducer/SET_COUNT';
export const RESET_COUNT = 'countReducer/RESET_COUNT';

// 액션 함수 정의
export const setCount = arg => ({
    type: SET_COUNT,
    data: arg,
});
export const resetCount = () => ({
    type: RESET_COUNT,
    data: { count: 1, isTen: false },
});
// ..\test_project\src\components\actions\loginActions.js

// 액션 타입 정의
export const SET_LOGIN = 'loginReducer/SET_LOGIN';

// 액션 함수 정의
export const setLogin = arg => ({
    type: SET_LOGIN,
    data: arg,
});
액션은 간단합니다. 리듀서와 연결하기 위해 액션 타입을 정의하고 dispatch()에서 사용할 액션 함수를 만듭니다. countReducer, loginReducer와 연결하기 때문에 명시적으로 이름을 붙여서 타입을 만들었습니다. 그럼 리듀서를 만들기 위해 액션처럼 src/components 폴더 안에 reducers 폴더를 만들고 이하 세 개의 소스를 추가합니다.
// ..\test_project\src\components\reducers\countReducer.js

// 액션 타입 불러오기
import { SET_COUNT, RESET_COUNT } from "../actions/countActions";

// 데이터 정의 및 초기화
const initState = {
  count: 1,
  isTen: false,
};

// 초기화 데이터로 리듀서 만들기
export default function reducer(state = initState, action) {
  const { type, data } = action;
  switch (type) {
    case SET_COUNT: {
      return {
        ...state,
        ...data,
      };
    }
    case RESET_COUNT: {
      return {
        ...state,
        ...data,
      };
    }
    default:
      return state;
  }
}
// ..\test_project\src\components\reducers\loginReducer.js

// 액션 타입 불러오기
import { SET_LOGIN } from "../actions/loginActions";

// 데이터 정의 및 초기화
const initState = {
  id: "",
  pass: "",
  setLogin: function () {},
};

// 초기화 데이터로 리듀서 만들기
export default function reducer(state = initState, action) {
  const { type, data } = action;
  switch (type) {
    case SET_LOGIN: {
      return {
        ...state,
        ...data,
      };
    }
    default:
      return state;
  }
}
// ..\test_project\src\components\reducers\index.js

import countReducer from './countReducer';
import loginReducer from './loginReducer';

// 리듀서 모아서 내보내기
export default {
    countReducer,
    loginReducer,
};
위에서 만든 액션을 불러와 리듀서에 붙여 줍니다. 중요한 부분은 state 데이터를 정의하고 초기화하는 부분인데 이렇게 리듀서 별로 만들어 놓으면 알기도 쉽고 조작하기도 편합니다. 실제로 사용하는 상위 소스에서도 다시 초기화가 가능합니다. 세 번째 소스인 index.js는 리듀서를 모아서 다음에 설명할 리덕스 스토어 생성에 사용하기 위함입니다.
// ..\test_project\src\components\reduxCreateStore.js

import { createStore, combineReducers } from 'redux';
import { composeWithDevTools } from 'redux-devtools-extension';
import reducers from './reducers';

// 리덕스 스토어 생성
export default initStates => createStore(
    combineReducers(reducers),  // 리듀서 결합
    initStates,                 // 스테이터스 초기화
    composeWithDevTools(),      // 디버깅 미들웨어
);
마지막으로 리덕스 스토어를 생성하는 부분입니다. 위에서 만든 리듀서 모음을 불러들여 combineReducers() 함수를 이용해 결합해줍니다. 세 번째 인자는 바로 지난 시간에 했던 리덕스 디버깅 툴과 연결하는 부분입니다. 미들웨어라고 하는데 추후에 따로 포스팅하겠습니다. 그럼 모든 준비가 끝났으니 실제로 적용을 해볼 차례입니다.
// ..\test_project\src\components\CountUpRedux_new.js

import React, { PureComponent } from "react";
import { Provider } from "react-redux";
import reduxCreateStore from "./reduxCreateStore";
import { setCount, resetCount } from "./actions/countActions";
import { setLogin } from "./actions/loginActions";
import Text from "./Text";
import Button from "./Button";

class CountUpRedux_new extends PureComponent {
  constructor(props) {
    super(props);

    // 콜백 함수 바인딩
    this.countUp = this.countUp.bind(this);
    this.resetCount = this.resetCount.bind(this);
    this.setLogin = this.setLogin.bind(this);

    // 로그인 리듀서 초기화
    const initStates_login = {
      id: "corona",
      pass: "dead4444",
      setLogin: this.setLogin, // 콜백 함수 연결
    };

    // 커스터마이징 함수로 스토어 생성
    this.store = reduxCreateStore({ loginReducer: initStates_login });
  }

  countUp() {
    // 스토어 데이터
    const data = this.store.getState();

    // 숫자 증가
    const countTemp = data.countReducer.count + 1;
    let isTenTemp = data.countReducer.isTen;

    // 10이상이면 true
    if (countTemp >= 10) isTenTemp = true;

    // 액션 함수로 데이터 저장
    this.store.dispatch(setCount({ count: countTemp, isTen: isTenTemp }));

    // 강제 갱신 (state 변경이 없어서)
    this.forceUpdate();
  }

  resetCount() {
    this.store.dispatch(resetCount({ count: 1, isTen: false }));
    this.forceUpdate();
  }

  setLogin() {
    this.store.dispatch(setLogin({ id: "아이디없음", pass: "ojimasio" }));
    this.forceUpdate();
  }

  render() {
    // 프로바이더를 사용하여 자식에게 데이터 전달
    const data = this.store.getState();
    return (
      <Provider store={this.store}>
        <React.Fragment>
          <Text>숫자값 : {data.countReducer.count}</Text>
          <br />
          <Text>10이상 : {String(data.countReducer.isTen)}</Text>
          <br />
          <Button name="countUp" onClick={this.countUp}>
            카운트
          </Button>
          <Button name="resetCount" onClick={this.resetCount}>
            리셋
          </Button>
          <br />
          <Text>ID : {data.loginReducer.id}</Text>
          <br />
          <Text>PASS : {data.loginReducer.pass}</Text>
          <br />
          <Button name="login" onClick={data.loginReducer.setLogin}>
            로그인
          </Button>
        </React.Fragment>
      </Provider>
    );
  }
}

export default CountUpRedux_new;
지난 시간에 했던 카운트 업 로직 그대로이며 간단하게 id, pass 데이터를 추가한 정도입니다. 중요한 부분은 생성자에 reduxCreateStore() 하는 곳입니다. 초기화하고 싶은 리듀서만 선택해서 데이터를 넣어주고 있습니다. 리듀서가 두 개 이기 때문에 데이터를 불러올 때도 countReducer와 loginReducer로 나눠져 있습니다. dispatch() 부분도 액션에 만들었던 함수를 사용하고 있습니다. 기초 시간에 했던 소스에서 많이 정리가 됐습니다. 그럼 스토리북 확인해보시죠!

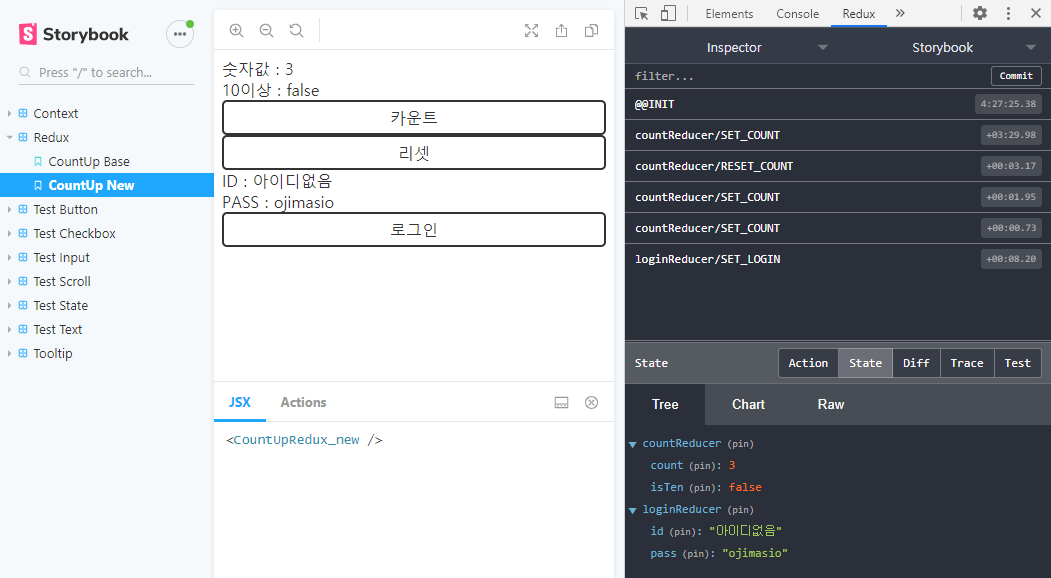
오른쪽 위의 디버깅 툴 화면 처럼 액션 타입 이름이 리듀서 별로 나눠져 있고 아래 State탭 정보 또한 두 개의 리듀서로 나눠져 있는 것이 확인 가능합니다. 이렇듯 코드를 분리하는 것 뿐만이 아니라 스토어 저장 공간을 리듀서 별로 나누고 관리를 하면, 리덕스의 강력한 기능을 조금 더 효율적으로 사용 가능합니다. 그럼 다음 포스팅으로 또 뵙겠습니다~!?
ㅇ ㅏ~ 힘들다...
2020/10/27 - [Web프론트엔드/리액트] - [React] 리덕스(redux) 기능으로 데이터 관리하기 ④ 해시맵
'웹 프론트엔드 > React 리액트 (기초)' 카테고리의 다른 글
| [React] 리덕스(redux) 기능으로 데이터 관리하기 ⑤ 커넥트 (0) | 2020.10.27 |
|---|---|
| [React] 리덕스(redux) 기능으로 데이터 관리하기 ④ 해시맵 (0) | 2020.10.27 |
| [React] 리덕스(redux) 기능으로 데이터 관리하기 ② 디버깅 (0) | 2020.10.22 |
| [React] 리덕스(redux) 기능으로 데이터 관리하기 ① 기초 (0) | 2020.10.16 |
| [React] 컨텍스트(context) 기능으로 데이터 관리하기 (0) | 2020.10.14 |


댓글